Wednesday, June 6, 2012

Battery boxes and racks

I've moved a few millimeters forward lately. This post will have a bunch of pictures of some test fittings of the batteries in the front battery racks and also some more shots of the hatch area of the car where the battery boxes will go. I cut a few pieces of aluminum to put under the batteries and on the ends. The ones underneath will help give a nice flat surface for the batteries to sit on since I have some bolt heads underneath the racks which stick up a bit. It will also protect the bottoms of the batteries if debris somehow gets kicked up underneath them. The end plates are there because I will be strapping the batteries together to help protect against swelling in the event of an over charge. From everything I have read, there does not seem to be a problem with swelling at this point as long as you stop the charge at around 3.6 Volts per cell average, but if a cell got out of line from the others, as far as voltage, then it could over charge and swell up. Early on, I will be checking the cells after charge and after use quite often, but after a while it will probably only be once a month or so.

Bumper rack with (8) TS 160AH batteries

Firewall rack with (8) TS 160AH batteries

Both racks loaded up

Reverse angle with Control board sitting where it will be mounted over the motor
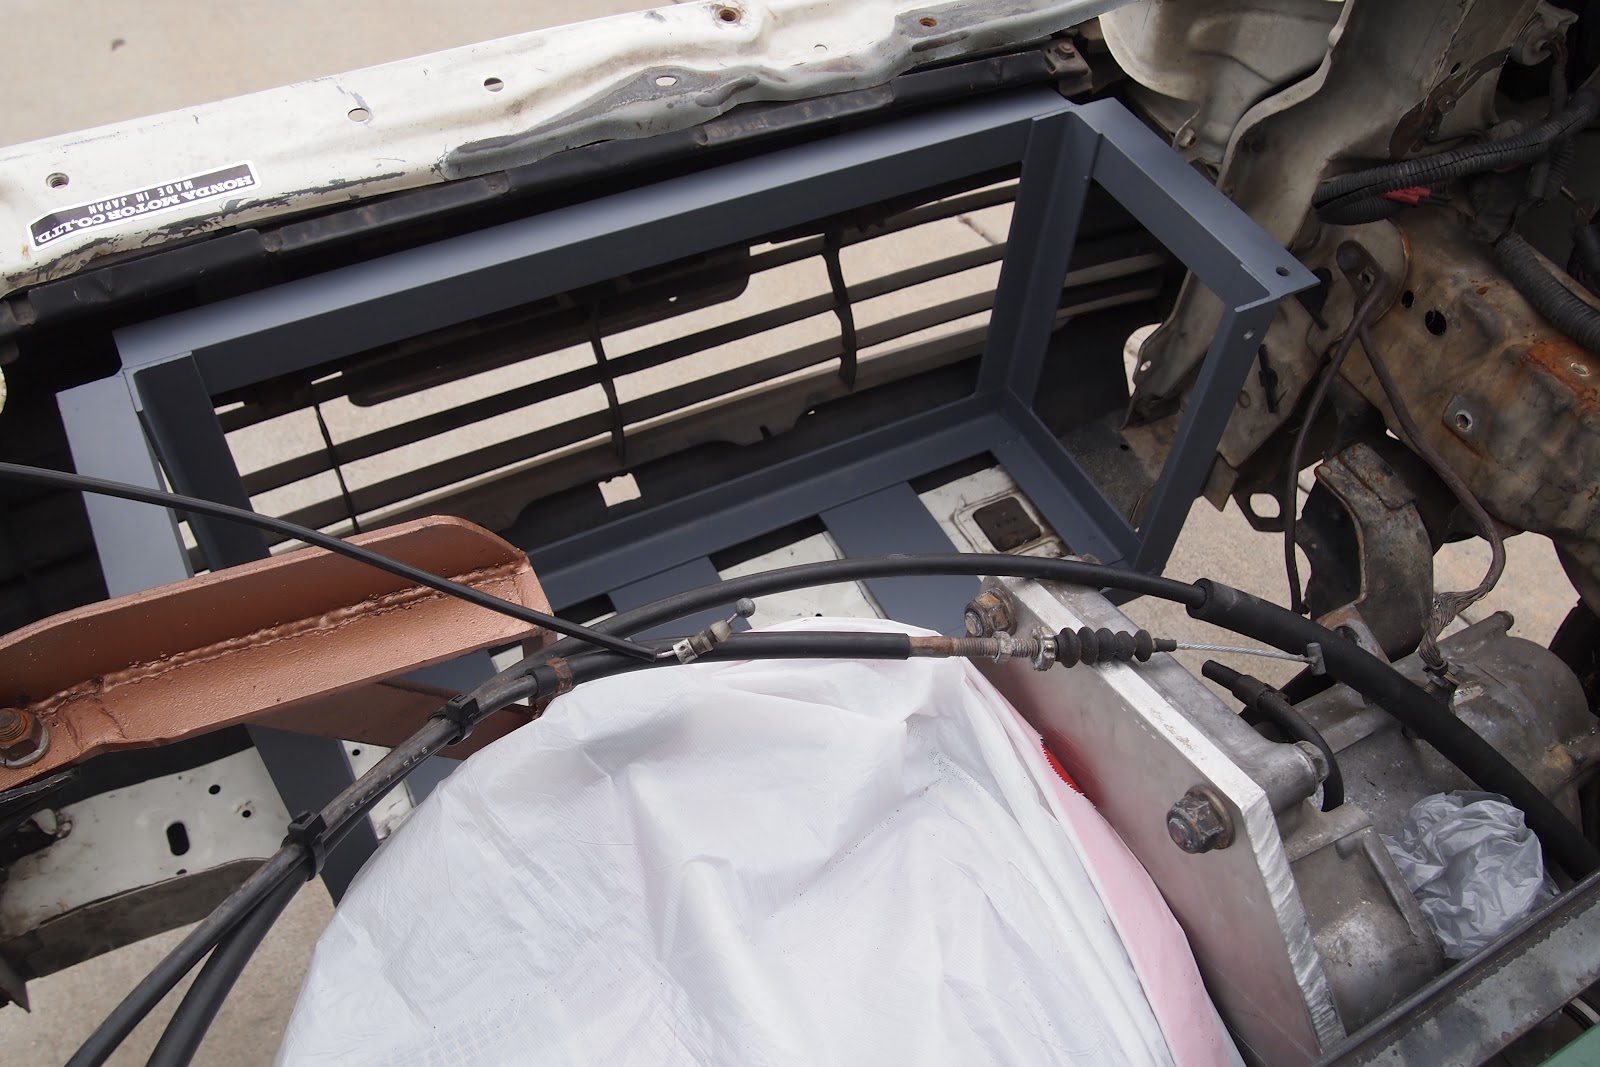
The next set of photos is in the hatch area. I finished painting the angle iron frame that the battery boxes will be hanging from, and have put them in place for a test fitting. I spent last weekend looking at what I need as far as hardware to bolt everything in place and making a big purchase list. I will be using a bunch of 1/4-20 Stainless Steel bolts and nuts, along with Nordlock washers. I am also buying a few M6 and M8 bolts for various areas where I can use the existing mounting points on the car.

Battery box frames in place

Added interior plastic to wheel well area

Note in the above picture the black plastic interior pieces. I got these off of a CRX forum a few months ago. Someone wrecked their car and was parting it out. My interior is actually blue, but I am ok with the black in the hatch area. I am still missing the piece on the back wall that covers the tail lights, so I will have to scour the net some more. It sure beats going to the local pick-a-part every weekend.

The next big issue is to look at the 12 volt wiring diagrams for the car and start to figure out what all the connectors are that are just hanging in the engine compartment. I didn't label them when we took the engine out and am kicking my self now. I won't need most of them, but I need the starter signal and there was some creative DIY wiring for a couple items that I need to figure out and replace.

Also, a couple guys are planning on coming over on the 16th to look at my progress and give me their thoughts before I head into a full week of work on the car. I am excited about that week, because I can knock out a bunch more things on my To Do list. Hoping to do a bunch of work on the control board and the original 12 volt system in the car.

Tuesday, May 8, 2012

Updated Wiring Diagram

I have updated my High Voltage wiring diagram and am posting it here for people to check out. Please let me know if you see any problems.


I have done a few things since my last post, but not a lot. April is a very busy month for me at work. I did some more work on the frames for the battery boxes, as well as did a trial fitting of the control board. I need to order some more hardware to secure it properly.


The month of May I should be able to get a few days in of work, and mostly will be trying to figure out details of hardware I need and make a plan for the big week in June that I will spend the whole week working on the car.

Friday, March 16, 2012

Wiring Diagram

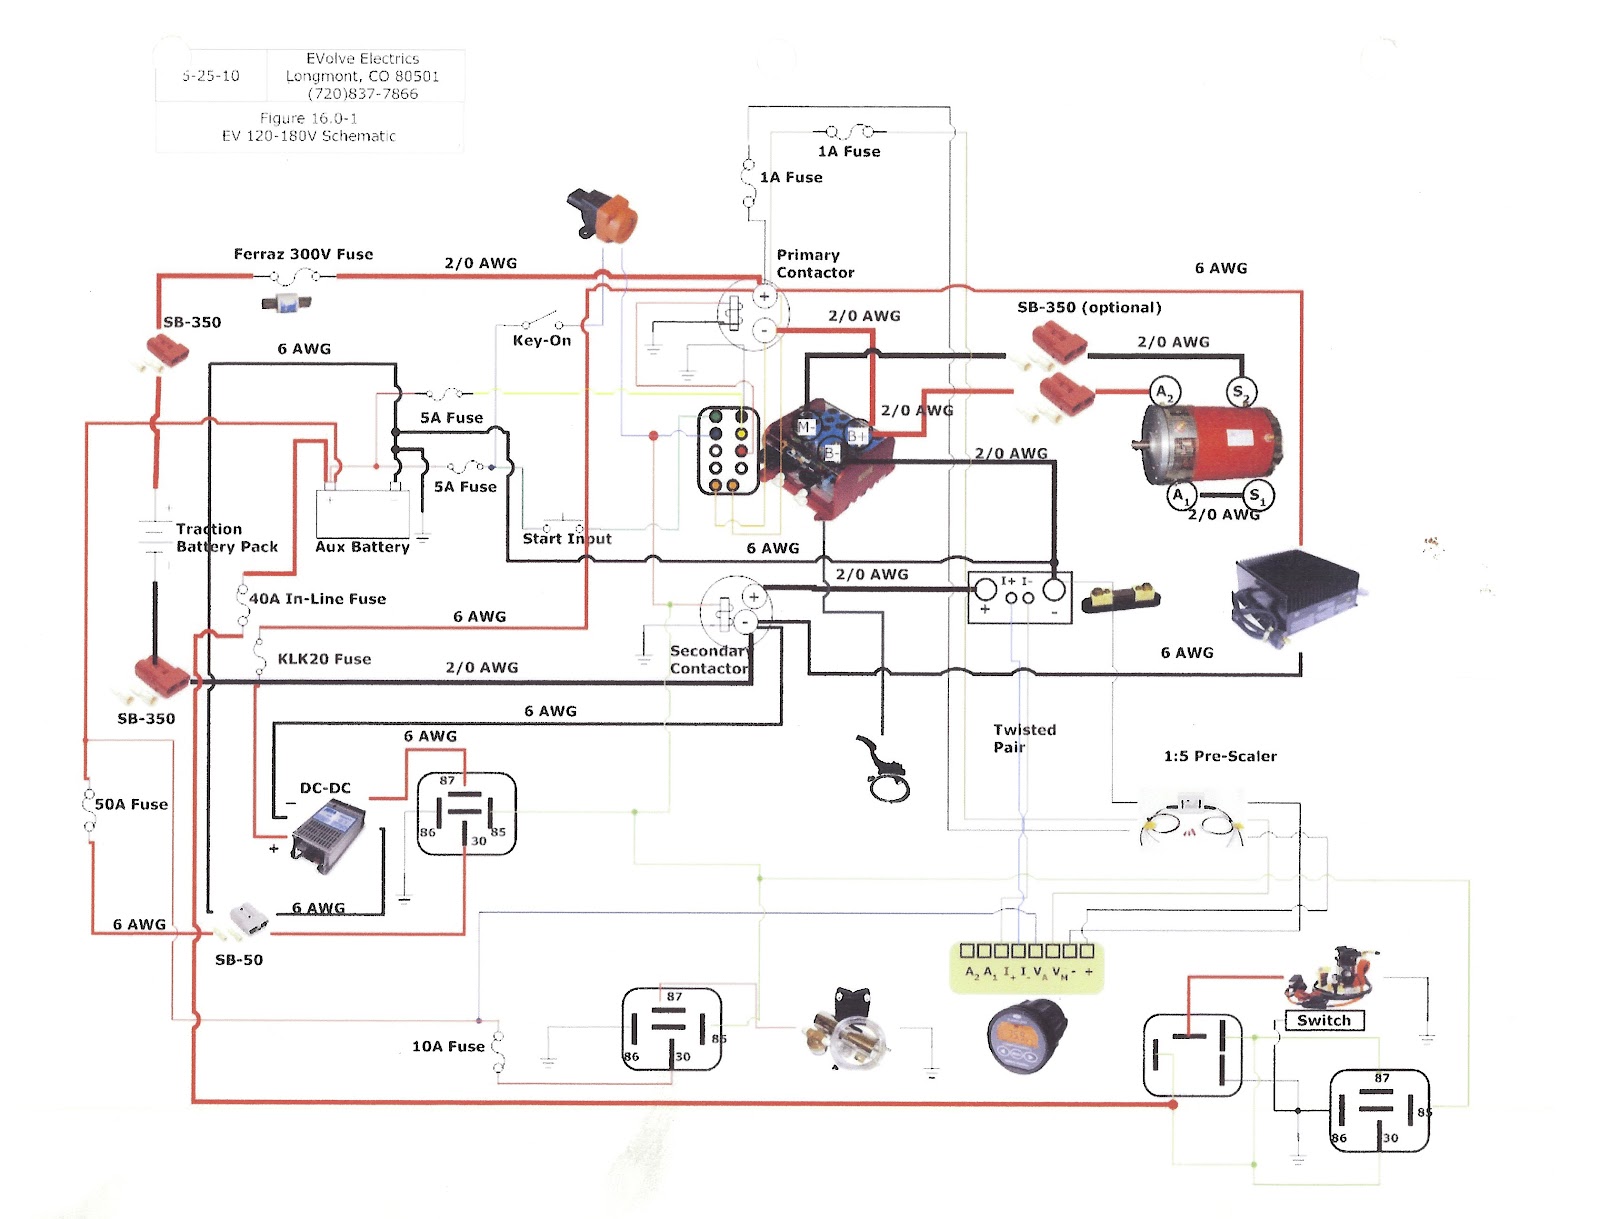
I am posting the wiring diagram I received from Evolve Electrics, and one that I am creating as well to simplify it a bit. The Evolve diagram looks good and is complete, but a little overwhelming to look at, so I thought I would seperate the High Voltage wiring into its own diagram and the 12V system on its own. So far I only have the high voltage one done and am still looking for advice on if it looks correct and I have things located properly.

The first one is the diagram I got from Evolve. I do not have the Netgain controller that is pictured, so some of the wiring on here is not needed for my setup. I will also need to modify some of it to work with my controller.
Evolve Electrics Wiring diagram

 This next one is the high voltage diagram I created to simplify the wiring for myself. Let me know if you see any problems with what I have here.
HV wiring diagram - Work in progress - DO NOT USE!

Thursday, March 15, 2012

Painting, Drilling, odds and ends

I have finished the painting on the front battery racks and have begun the process of figuring out the mounting of the rear battery boxes. Here are some shots of the finished battery racks.
This rack will be mounted to the firewall and will hold (8) TS 160AH batteries
This rack will be mounted in the bumper area and will also hold (8) TS 160AH batteries

Quite some time ago, my buddy James made two angle iron frames to go around the holes I cut in the hatch floor. We also cut  and bent a bunch of aluminum for the battery boxes which will hang from the frame. I have also cut a couple pieces of steel to help stiffen the hatch floor around the frame so the boxes don't just drop out of the car if I hit a bump or hit the brakes hard. These boxes will hold the remaining cells. One will hold 20 and the other will hold 8. If you are playing along, that is a total of 44 batteries at 3.2V/cell and a total pack voltage of 140.8 volts. This is a 22 Kilowatt pack which should get me about 65+ miles of range at 60mph. I do not plan on pushing them that far because it will significantly reduce the life of the cells. My commute is 22 miles one way and I can charge at work, so I will only be using about 40% of the pack at a time on a regular basis. I recently assembled the battery boxes and took some photos.
Rear most battery box which holds (8) TS 160AH batteries
As you can see, my boxes are a bit different than what many people have done. The batteries stick out of the top by a couple inches. I designed it this way for a couple reasons. The boxes would hang too low and cause clearance issues if I set the batteries all the way in them. I am still concerned about this box since it is the closest to the back of the car and whether it may scrape going in or out of a steep driveway. The other thing it does is makes it a little easier to take a cell out if I need to test it or replace it. I am hoping I will not have to do this at all, but that was the idea. Many people cover their boxes which I think is a hold over from the lead acid days, or if they live in a very cold climate, it helps with keeping the cells warm. These cells only vent in an over charge situation and I have designed my charging system to avoid that as much as possible. Also, I live in SoCal, so the temperature shouldn't really be a problem. I will add some sort of strapping over the batteries to keep them in the boxes in the event of an accident. Here are some shots of the large battery box. It will weigh in at over 250 lbs.
Bottom of large battery box - 24 screws and nylon lock nuts

Top view of large battery box

Batteries have found their home

A nice yellow glow of happiness in their new home
I forgot to take a picture, but over the top of the screw heads at the bottom of the boxes, I have a couple pieces of aluminum to make a nice flat surface for all the batteries to sit on. You can see them in the above picture on the left side.

Over the next couple weeks I hope to finish the drilling and painting of the battery box frames and get those installed in the car along with the front battery racks. After that I think I will start working on mounting the component board and figuring out the layout of the components which will be on the component board. I think I still have 250+ hours of work ahead of me, but one by one I am getting things crossed off the giant to do list.

Tuesday, February 21, 2012

Weekend Update... with Norm MacDonald

I got a few things done this weekend. My wife took care of the baby on Sunday so I got most of that day to work and then her mom watched the baby on Monday afternoon and I got 4 more hours in.

On Sunday I did more work on the install process for the battery racks in the motor bay. I got some American made Cobalt bits and metal cutting oil on Saturday from Harry J. Epstein Company. This helped my metal drilling immensely. Having the right tools, (and knowing what the right tools are) is a major time, stress, energy and money saver. I am thick headed, so I plow ahead and make mistakes and then learn the hard way. I know this about myself, and still amaze myself at how often I could have taken a few minutes to learn a bit before trying it out myself. Anyways, onward ho! I drilled some more holes in the battery racks, as well as cut off some unwanted portions.

Firewall rack with unwanted angle removed

Bumper rack primed and ready
Next, I installed 6 rivnuts into the bumper area for the bumper rack. I am also going to make some brackets to attach the top of the rack to the bumper. This should stop any shifting of the rack when I brake or accelerate quickly.

6 Rivnuts in place

Close up of RivNuts - Surface was not flat, but they will hold well
I put some bolts in the Rivnuts and borrowed my daughters fingernail polish and put a drop on top of each bolt. Then set the rack down on them to get a mark for where I needed to drill holes. I quickly learned that I should have done this 1 bolt at a time instead of trying to do all six at once. I made a couple holes that were off and I had to re-drill. Definitely do this one hole at a time to make sure the mark is correct.

All the mounting holes were drilled, so off to get a coat of paint. I cleaned the racks with Acetone, then ran a metal brush over them to scuff them a bit. Someone gave me that hint. I guess it accepts paint better. Primered and added the first coat of Hunter Green Spray Paint. I also bought a regular can of Hunter Green and a brush because one of the guys helping me said it wastes less paint. I already have a couple cans of spray paint, so I will use them and save the regular can for any touch-ups and the frames for the battery boxes in the hatch of the car.

Well I have sufficiently bored you with some battery rack details, but maybe someone will learn something from my mistakes and do it right the first time.

Sunday, February 12, 2012

Re-mount

This weekend I got the motor mount fixed and some welding done on the battery racks. The motor mount was more trouble than I thought. It came off fine and Bruce cut some excess off the top and bottom of one side, and then gave me some rubber to glue to the inside to help it grip the motor. The bracket James made for it is great, but it was making the mount sit a little off, so I hammered at an angle piece to let it sit a little straighter. Then I added a couple pieces of 1/8 steel between the bracket and the mount to help straighten it more. Also I expanded some of the bolt holes to raise the bracket higher by just a bit.

Motor mount and bracket re-installed
Bruce welded a couple pieces for me as well, so now I can move forward with finishing the battery racks. Unfortunately I have decided to cut the racks down to be more like battery trays, so a lot of James' hard work in making them is going to be cut away. Sorry James. I am going to strap the batteries in using two of the vertical supports on the racks, but cut the other two vertical supports off the firewall rack. The bumper rack will probably remain as is but I am going to bolt a flat piece of aluminum to the top of the open area so I can remove it to get the batteries in while it is installed.

Bumper rack with metal welded to bottom for mounting

Firewall rack with two brackets mounted to the front for Control board mounting

 During the week I will clean up the racks with acetone and drill the remaining holes needed. Next weekend I am shooting for cutting my 1/8" aluminum sheet to the size I need for the control board, cut the racks down, and start painting them, although I need the weather to cooperate.

Saturday, February 4, 2012

Riveting

So I ordered a $20 tool to install the rivnuts since my homebrew version did not do so well in tests. This tool performed adequately today and I have added two rivnuts and a support bar for a battery rack to the car. One of the rivnuts was off just a tad, but not enough to hurt anything, so I installed the support bar. I also cut a few pieces of angle iron to use as brackets and, at one point, my thumb got a little too close to the angle grinder. I am missing some skin but all is well.

I also ordered some Stainless Steel bolts, washers, and nuts for various things, as well as some nylon spacers I will use in securing my control board. I still need some nylon washers for the bolts on the control board to isolate the control board from the body of the car. Not everyone does this but I thought it would be a good idea.

Support bar for Firewall Battery Rack is installed

With the unfinished Firewall Rack sitting on it


It doesn't look like much, but today was a big victory for me since I made and installed the support bar on my own. (Except the RivNut idea, which JRP3 from diyelectriccar gave me)

I am hoping to take my racks and the little bracket pieces I made to Bruce's next weekend to do some welding. I may ask him to drill some holes in the angle iron as well, since he has a drill press and can do it much easier than my hand drill.

After that I will move on to cutting out a big piece of aluminum for the control board.