Tuesday, July 2, 2013

3...2...1....abort

1. New coupler designed and created - Check (Thanks Paco)
2. New Coupler attached to motor - Check
3. Motor tested with low voltage - Check
4. Tranny opened and bearing replaced - Check
5. Motor and Tranny mated together - Check
6. Motor/Tranny tested at low voltage - Check
7. Motor/Tranny re-installed in car - Check
8. Tranny fluid added - Check
9. Motor/Tranny tested at low voltage in car - Check
10. Motor/Tranny tested at slightly higher voltage - Check
11. Test tranny by changing gears - uh, Houston, we have a problem.

So everything was going as smoothly as it could have on Saturday, other than the near triple digit heat, all the way until the point where I thought I should check the motor/tranny out in different gears to make sure we don't hear any weird noises. It apparently did not occur to me during the previous tests that the tranny was in a gear and spinning the axles and that maybe it should have been in neutral just as it was when I removed the tranny from the car. Somehow, during reassembly, I think I locked the transmission into a gear, so I can now go forward, but can't change gears or go backwards. The last item in the above check list should have been done right after number 4. 

So, now the motor and tranny are joined together and back in the car and I have to either find a simple solution for unlocking it from the gear it is in, or take the whole thing out again, open the transmission and figure out why it is not switching gears. There is some hope though. There are 3 bolts that have springs and a ball bearing on the end which tighten up against three shafts in the transmission which shift the gears. My hope is that since one of the shafts is engaged on a gear, that maybe that bolt is overtightened and won't allow me to move it to get back into neutral.

Here is a shot of the bolt holes where the bolts with the springs and ball bearings go.

Bolt holes for Detent bolts
Zoom in to read the text
The next shot is the tranny right before we put the case back on. You will notice that 4th gear appears to be engaged and that the detents in the shift shaft are deeper for when the shaft is engaged in a gear than the detent for neutral. This is my hope, that since it is engaged in 4th, I tightened the detent bolt, spring and ball bearing down too hard and now it won't let the 3rd/4th shift shaft move back into the neutral position.


Sunday, June 23, 2013

Grinning and Bearing It

Got the tranny out of the car today. Pretty proud of that moment since my friend James took the motor and transmission out last time. I had to do it on my own this time. Fairly simple actually, since the tranny is all that is in there now. Just remove the wheel hubs from the struts and the steering control rods and then knock the half shafts out of the hubs. Take a screw driver and a hammer and give a whack to the CV joints connected to the tranny and there you have most of the work done. Climb under and undo one bolt and knock a pin out of the stick shift control arms and you are almost there. Then put a jack under the transmission and undo the bolts connecting it to the rubber mounts and lower it down. Thats it. I didn't take any photos of that journey, but coming next is the reason I got it out of the car. Broken Input Shaft Bearing.


Before...
Removed the cover to the 5th gear section
Close up of 5th gear bearing, selector arm and countershaft
5th gear bearing, arm, synchro and gear removed
Keeping track of the order pieces are removed
Remove bolts, springs and ball bearings from gear shift shafts
Main case removed - Differential on left, Main and countershafts on right
Over the top
Game of Thrones shot
Reverse is removed
My Neighbor, Paco, removing some bolts
Main Shaft and Counter Shaft removed - See broken bearing on upper right
Center of broken bearing removed - Real pain to get outer bearing case removed when it is broken
Shafts on the table - Notice bits of metal on cardboard - broken bearings that came out of tranny
Here is the outer bearing case stuck in its home - Paco saved the day and got it out
Put in new Input Shaft Bearing and started reassembly
Another Game of Thrones shot - Winterfell rising from the Flames
The work table
All re-assembled - Number 5 is alive
Spin the shaft and magically, no clicky clicky sound and the shaft doesn't wiggle about

So, theres it is. What a day. So glad we got it all back together and it appears it should be good to go now. Next weekend I will get some Transmission fluid in it and mate it to the motor. Then give it a low voltage test and see how it sounds. If all goes well, then it will go back into the car for some more testing. Pretty pumped about everything I learned today and how smoothly it went.

Saturday, June 1, 2013

2 problems, 1 solution

Well, the 1 solution will not fix the two problems, but I believe we have fixed one problem. The other issue is going to be tougher, but I think I can do it.

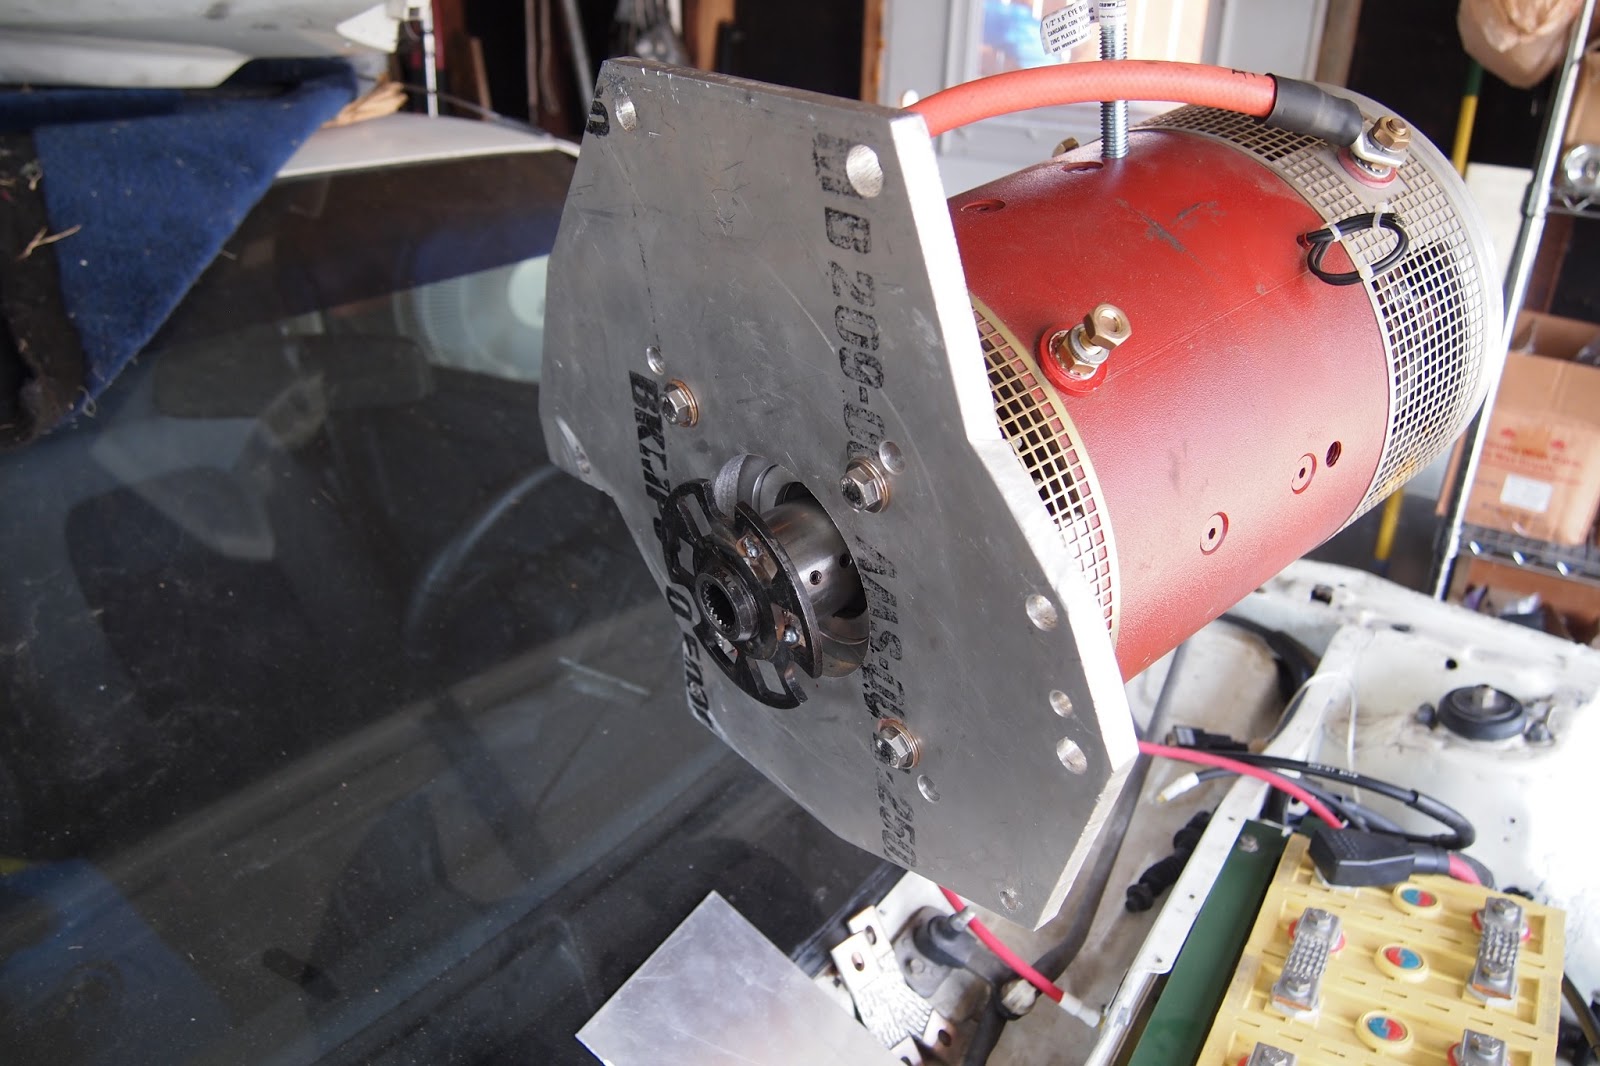
My neighbor, Fransisco, made me a new coupler out of some hard steel and it looks great. It is longer and covers most of the shaft. He also got me a hardened cobalt alloy key which is pretty hard. Hopefully it will not snap. The coupler fits nice and snug, although I thought he was going to make it a tad small and we were going to heat it up to get it on. He thinks the two set screws with loktite and the full length key and coupler will keep it all together very well. It fit perfectly and I feel confident this problem is solved. The coupler is welded to the other piece from the original coupler that mates to the transmission. He added two pins between them which will help secure them together when the torque is added from the motor.
Motor, adapter plate and coupler attached and ready to go

Close up of the coupler
He also made a 1/4" aluminum plate that goes between the motor and the adapter plate. My original plate was not wide enough and the coupler bottomed out, so I added some large square washers the first time. Now I have a nice 9" round 1/4" thick plate that is perfect.

We got the motor back in the car and applied power for a test. Uh oh..... still got the noise. We are pretty confident in the new coupler and its connection and we did not hear any noise from the electric motor by itself, so it must be the transmission. I have suspected something is up with the tranny for a while and it just happened that I had two problems. The tranny and the coupler. Well, we had to take the motor out and once we did, Paco, that is what we call Fransisco, spun the tranny shaft, and sure enough, we heard the same noises as I have heard from the beginning. Paco's mind started spinning and then he said, "I think you have some bad bearings on the transmission shaft." We spun it a few more times, and sure enough, that is exactly what it sounds like. Could be bearings somewhere else in the transmission, but when we listened it sounded close to the shaft. Also, the shaft had some play in it. He said that was not good.


So, we fixed the coupler issue, but have found, and I think identified, another problem. I now have to figure out how to pull the half shafts, and get the tranny out. It cannot be used, so I might as well open it up and take a look. Maybe it will be an easy fix with some new bearings just on the shaft and I won't have to muck around in the gear box at all. I have never done this, so I will be watching some videos and seeking help on some Honda CRX forums.

Monday, May 27, 2013

Post Mortem

To celebrate the many wonderful men and women who serve and have served our country in military service, I did an autopsy on my broken coupler. I know that does not really connect in any way, but that is what I did this memorial day. I did enjoy a couple flyovers of 7 WWII planes.

I got the engine hoist from a neightbor yesterday and started working on it today. Got the motor out and found that the key in the coupler did not break, but did work its way out as a few people said it might. What I am not happy about is, the coupler that I got from a company Evolve Electrics sent me to for the adapter/coupler combo, failed. I have notated this before, but they sent me the wrong thing a couple times and then they assured me what I had would work. I will note that I don't believe Evolve uses this company for adapters and couplers anymore. It turns out they used a part of a Lovejoy connector for the motor connection side and it is made from a soft steel. The torque from the motor shaft on the key deformed the keyway on the coupler and the key wiggled out. Here is a shot of the coupler with the deformed keyway.
Deformed Keyway in coupler
Here is a shot of the key. It survived, but has minor damage at the end which I believe is where it finally came out of the keyway.
Key with minor damage
Unfortunately the motor shaft also took some damage, but I think we will be fine once we get a better coupler made that extends down the majority of the shaft. You can see the dark area on the shaft at the front of it. This is how far this coupler would go onto the shaft. Not even half way.
Damage to motor shaft
So I showed the coupler to another neighbor and he said he thinks he can salvage the splined side of the coupler that goes on the transmission input shaft. He said he can make a better connection on the motor side and make it extend down the entire motor shaft and also make it a compression fit. He is a life saver. I would be looking at $300-400 for a new coupler. He makes stuff for his bosses at work, so they don't mind if he does a few side projects on the machines. I could have the coupler this week and the motor back in the car next weekend. As these things go it will probably be a couple weeks.

I thought I would take a couple photos of some of the more recent work I have done with the mounts for the vacuum braking system. This is the bracket that came with the vacuum pump and where it is mounted on the front sidewall of the car behind the headlight.
Vacuum Pump mount
 And this is the bracket I am making for the vacuum canister. It still needs a couple mounting holes and then a paint job.
Vacuum canister mounting bracket
So that wraps up the weekend. Hoping to get the re-worked coupler this week and maybe get the motor back in on the weekend. Then back to the vacuum brake system.


Monday, May 20, 2013

Back in the Saddle

April and May are the busiest months for my work followed closely by August and September. It is so easy for me to get discouraged about the project during these times because I just cannot spend time with ERX. This time of my life is probably not the greatest either since I have a teenager, a fairly new wife and a 21 month old toddler. This project has gone on for more than 3 years now. My wife and I are growing weary of it. Mostly my wife, but there have been many times I have almost thrown in the towel, and just about did at one point. But now that work has calmed down, I can see my family on a more regular basis, and there is some time to continue with the money pit, I mean, incredibly exciting electric car conversion project.

This last weekend I got in the garage again and did a little work, which got me more motivated to keep it going. The last thing I had done was run the charging wire from the rear of the car to the front where it will interconnect with the high voltage system. It would have made more sense to find space up front for the charger, but most of the space is in the rear, so that is where the charger ended up. I will connect to the charger with a regular AC plug through the fuel door. Anyways, I crimped some connectors on both ends of the 6AWG wire. The front connectors are just a ring terminal that will wire into my high voltage bus bars and the rear wires are now in an Anderson SB-50 connector. I could not easily access the fuel door yesterday because my neighbor has his Harley in the garage, so I moved onto another item that needed attention. I am installing a vacuum brake system for the power brakes. Some people just wire up a vacuum pump right up to the master cylinder and then when they hit the brakes the pump turns on, creates the vacuum and this allows the power brakes to easily stop the vehicle. There could be a very small delay between hitting the brakes and the pump turning on, so many people have added an extra vacuum canister to have a reservoir of vacuum. I had already mounted the bracket that came with the vacuum pump, but still needed a location and mount for the canister. I found a nice location near the pump and the master cylinder and just cut a small piece of angle iron to mount it on. I drilled the mounting holes for the canister, and that was all I could get done yesterday. I still need to drill a couple more holes for mounting it to the car, and then put a couple rivnuts in the car so I can bolt the bracket on. I should probably spray paint it as well.

This week I will be borrowing my neighbor's engine hoist, so hopefully this weekend I can pull the motor and see what broke in the tranny. I really hope it was just the key between the motor shaft and the coupler.

Sunday, March 24, 2013

Slight Sigh

Bad news - I did not have time or a hoist to remove the motor today.

Good news - I looked in the starter motor hole and put my fingers in. The coupler was able to spin around the motor shaft. After a few revolutions it kind of stuck to the shaft, so I used that to try and figure out if the tranny input shaft was ok. I put the car in gear and tried to spin the motor with my hand. I couldn't spin it, which is a very good sign that the input shaft is ok. I am hoping all that happened was the set screw came loose and the key came out, or the key was weak and just snapped. I think I got a key from OSH, not thinking it needed to be any specific hardness or heat treated. Also, I am not sure if I added thread lock to the set screw or not. I was told by the engineer who made the coupler that it was taper lock and it did need to be tapped onto the shaft, so I believe the original fit was very tight. Not sure if the coupler is still usable or not, but I think the motor shaft and input shaft for the tranny may be ok.

Next weekend I hope to take the motor off and maybe the transmission as well. I need to get a hoist to hold the motor while I disconnect it from the transmission.

Any of you know how to get bolts off that have red loctite on them? I think I read heat somewhere.

Sunday, March 17, 2013

Oh snap

One of my neighbors works on a cnc machine and he made me some aluminum brackets to hold down the batteries in the rear battery boxes. I have spent the last couple weekends drilling holes through them and attaching them to the boxes. I also figured out a way to mount the vacuum pump for the brakes, and attached the bracket for it.

After I finished these things today, I thought I would take the car around the block a couple times. I wanted to try out a new setting on the controller to see if it would be more responsive in ramping up the acceleration. I noticed at the first stop sign that it was much more responsive, but there was a slight jerk at takeoff, so once I got around the block I figured I would adjust it a bit and see if it was better. At the next stop sign, I touched the accelerator and SNAP! The car was not accelerating and the motor was spinning freely. I tried a couple other gears, but the same response. Uh oh. This is a major issue, but it was not unexpected. My best guess is the shaft coupler between the motor and the transmission snapped. I have had a feeling for quite some time that my motor was not aligned properly with the tranny or that the parts I received for the shaft coupler and the adapter plate were not right. There has been some noise in neutral and in various gears under different circumstances and I thought I would need to take the car to a tranny specialist to make sure the motor-tranny connection was good. I won't know for sure until I get the motor out of the car, but I would bet the coupler is broken. I really hope I did not break the motor shaft or the tranny shaft. That would seriously suck.

Well, the bright side is, I was two blocks from home and my neighbor had a tow rope and got me back without any trouble. In the next couple weeks I will attempt to remove the motor and see what happened. I don't know if any of this is worth it anymore. I am learning and am proud of the work I have done so far, but  if I have to buy a new adapter plate and coupler which will run $900-$1000, I don't know if I want to continue. I know my wife won't want me to, and I kinda don't blame her. This thing is a money pit and a time hog. Probably not the best project for someone with a young family and limited experience with tools and cars. I knew all this going in, but, like having a baby for the first time, it isn't real until it gets real, and it is definitely getting real.